|
Printing a Poster
|
Previous Top Next |
| Please follow these steps to print a poster.
|
|
|
| 1. | The first step is to design your poster so you will need to open one of your favorite programs, such as Microsoft Word, Paint, PowerPoint, CorelDRAW, Adobe Photoshop, etc. and input text, graphics, charts, and any other information you want to appear on your poster. When you are finished open the print dialog, commonly found by going to File > Pirnt.
|
| 2. | In the design applications print dialog choose the Click2Poster printer. Click2Poster will appear with your computer file.
|
| 3. | Choose the Category from the drop down.
|
| 4. | Choose the size in the Layout drop down.
|
| 5. | Press the Print button on the menu bar.
|
| 6. | Your pages are sent to the printer.
|
| 7. | Follow the x, y coordinates located in the top/left corner of each page to assemble the poster.
|
|
|
| Another option is to use the Poster Wizard. Where you will simply choose the size of your poster or banner, and Click2Poster will automatically determine the pages needed to create your sign.
|
|
|
| 1. | Follow steps 1 through 3 above.
|
| 2. | In Click2Poster choose the Wizard button on the Menu bar.
|
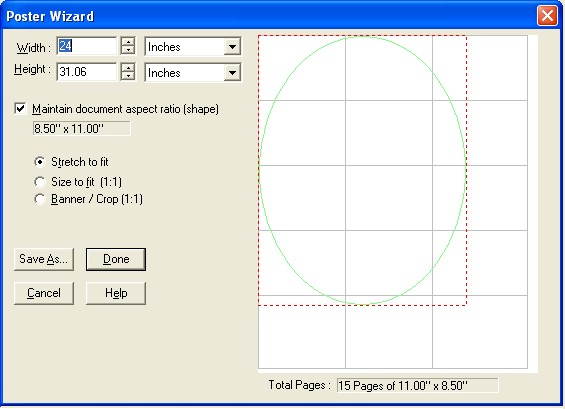
| 3. | The Poster Wizard dialog pops up on your screen.
|
|
|
| 4. Enter the dimensions of your poster. You can choose from inches, feet, centimeters, meters, or pages.
|
| 5. | Mark the check box for Maintain document aspect ration (shape). By selecting this option you can change Width OR Height and the other one will be calculated for you to keep the poster the same shape as the source document. If you haven't printed a document to Click2Poster yet, it will keep the same shape as your default paper setting. Using this option will make it so it does not matter whether you choose Stretch to fit, Size to fit (1:1) or Crop/Banner.
|
| 6. | Choose a scaling radio button:
|
| · | Stretch to fit will stretch your source document to fit the poster size. Photos may not look right if stretched too much. Stretched letters usually look fine unless stretched too much.
|
| · | Size to fit (1:1) - will make your document fit and not be stretched. Click2Poster will center the document if you have made the poster size too wide or too tall. This is a good option if you have photographs.
|
| · | Banner / Crop (1:1) - will make your document fit in one direction only, and crop off the rest if the poster/banner is not the same shape as the source document. Note: A banner is a just a really wide, or really tall poster. If you want to do a banner, you should choose Crop/Banner and only the top part of your document will be printed. In your application (like Microsoft Word), you would put your words like "Congratulations to Johnny on making straight A's" at the top of the Word document. The bottom part of the Word document will be "Cropped" off and not printed on the banner.
|
| 7. | Save As... allows you to save your custom poster size as a new layout.
|
| 8. | Press Done to apply changes to your poster and close the wizard.
|
| 9. | Press Print on the menu bar to send your poster to the printer.
|
|
|
| See information for Assembling a Poster or Banner
|
|
|